
Custom Header Access Control
Last update:2026-07-13 14:34:09
Custom header blacklists and whitelists allow you to define specific HTTP headers that requests to your CDN content must match. This mechanism ensures that access is granted only to requests with authorized headers or specific header values, helping prevent hotlinking and protect your content.
How to Set Up a Custom Header Blacklist or Whitelist
- Log in to the Atomile Console and select the appropriate product.
- Go to Configuration, locate the domain you want to configure, and click Edit Configuration.
- In the left sidebar, go to Access Control - Header Access List and click Add.
- Configure the settings according to your requirements.
Effective Range
This defines the range of requests to which the custom header blacklist or whitelist applies. You can choose from the following options:
| Setting | Description |
|---|---|
| All Requests | The access control rule applies to all request types. |
| Only Homepage | Applies only to the root directory of the domain, such as http://domain/ or https://domain/. |
| Specified File Type | Applies only to specific file types. You can select predefined file types or define custom file types. Separate multiple custom types with a semicolon ;, for example, jpg;png. |
| Specified URI | Applies only to requests for content at a specific URI. Two URI matching options are available: Exact matching: Matches the complete URI, including query parameters, for example, path/index.html?abc=123.Ignore parameter matching: Matches the URI without query parameters, for example, path/index.html. |
| Specified Directory | Applies to requests under specific directories. For example, /file/abc/ applies to all content under http://domain/file/abc/*.Note: Directory paths must start and end with / and can contain only letters, numbers, and certain special characters (underscore, hyphen, percent sign, and period). Separate multiple directories with line breaks. |
| URL Pattern | Uses regular expressions to define the range of requests to which the rule applies. For example, the pattern .*\.jpg$ ensures that access control applies to all URLs ending with .jpg. |
Header Type
You can configure a custom header blacklist or whitelist based on your requirements.
| Configuration | Description |
|---|---|
| Blacklist | To configure a blacklist, specify the custom request header and the corresponding values that are not allowed. Header Blacklist: The name of the custom HTTP request header to validate. Each blacklist rule can include only one header name. Header Value Blacklist: The disallowed header values. If any of these values are present in the request, access is denied. Multiple values can be configured and should be separated by ;. |
| Whitelist | To configure a whitelist, specify the custom request header and the corresponding values that are allowed. Header Whitelist: The name of the custom HTTP request header to validate. Each whitelist rule can include only one header name. Header Value Whitelist: The allowed header values. Access is permitted only if one of these values is present in the request. Multiple values can be configured and should be separated by ;. |
| Referer | Determines whether to validate the header from the client side or the server side. Client: Validates specific HTTP request headers sent by a client, such as a browser or application, to ensure they meet the configured rules. Server: Validates specific HTTP response headers returned by a server, typically the customer origin server, to ensure they meet the configured rules. |
The system supports only one custom header whitelist, and it can contain only one custom header. If you need to configure multiple custom headers, contact Atomile technical support for assistance.
Action
Choose how to handle requests that do not meet the configured rules:
- Deny Access: The CDN rejects the request and returns HTTP status code
403. - Redirect URL: The CDN redirects the request to a specified URL.
Ignore Case
Determines whether the custom header blacklist or whitelist is case-sensitive. If set to Yes, the values in the list are not case-sensitive.
Priority
When multiple access control rules are configured, the CDN applies them based on numerical priority. Higher numbers are evaluated first.
After you complete the configuration, click OK, and then click Next to submit your settings. To minimize potential disruption to your production environment, we strongly recommend performing a Pre-deploy test in a staging environment. This important step helps ensure that your configuration is correct before it goes live.
After you confirm that the settings are correct, click Deploy Now to apply them in the live environment. The configuration typically takes effect within 3 to 5 minutes. For more information about pre-deployment testing and validation, refer to Deploy the Configurations to Staging Environment for Validation.
Best Practices
Example 1: Configure a Custom Header Blacklist
Deny access if client requests include the header Test-Header with the value key1 or key2.

Example 2: Configure a Custom Header Whitelist
Allow access only if client requests include the header Test-Header with the value key1 or key2.

Notes
Do not configure a custom header blacklist and whitelist at the same time, as this may cause all CDN access to be denied and disrupt your online services. For example, if both blacklist and whitelist rules are configured for the same header, all requests may be denied.
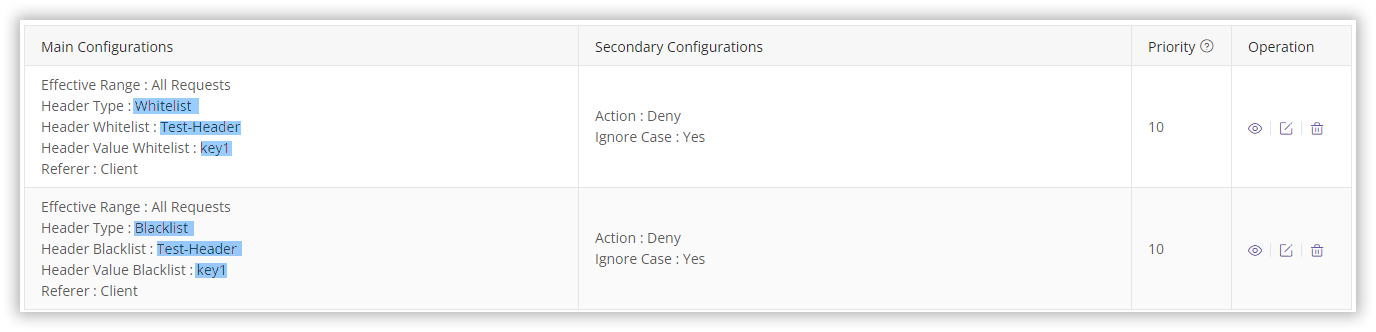
Why Might All Access Be Denied?
- If a request contains the header
Test-Headerwith the valuekey1, it matches the blacklist rule and access is denied. - If a request contains the header
Test-Headerwith a value other thankey1, it is not blocked by the blacklist, but it also fails the whitelist rule, which allows only the headerTest-Headerwith the valuekey1. As a result, access is still denied.
If you need to configure both a blacklist and a whitelist, contact Atomile technical support for assistance to ensure the configuration is set up correctly.