
Understand IAM Policies
Last update:2026-07-10 16:23:54
Atomile Console IAM provides policies that control user permissions across all Atomile services. These policies define specific actions that can be allowed or denied for different users.
Policies combine multiple permissions into a cohesive rule set, allowing you to:
- Grant defined permissions to Sub Accounts
- Control which users can perform specific operations
- Manage access by attaching or detaching policies as needed
Each policy consists of:
- Effect (allowed or denied)
- Actions (specific operations on Atomile products)
When creating a policy, you specify:
- Actions: Define which Atomile product operations users can perform. For example, allowing a user to execute the POST_CONFIGURATION action for Content Acceleration. Any actions not explicitly allowed are automatically denied.
- Effect: Determines whether access is allowed or denied. Since access is denied by default, most policies are configured with an allow effect.
Understanding Policy Types
By Ownership
Policies are categorized based on who creates and manages them:
- System policies: Created and managed by Atomile. Customers cannot modify these policies, but they can attach them to user accounts.
- Custom policies: Created and managed by customers according to their specific business requirements.
By Creation Method
Policies can be created using two different approaches:
-
Functional policy
- Controls access to Atomile Console features such as traffic reports and domain configurations
- Used primarily for CDN and other key products
-
Expression policy
- Assigns specific operation permissions for resources at the syntax level
- Currently supports only UC and a limited number of other products. For more details, contact support.
- Not applicable to CDN products
What is UC?
UC (User Center) is Atomile’s identity management service that handles policies related to:
- IAM permissions
- Control Group management
- Contact management
- Access key and API key management
Understanding Naming Conventions
Action Names
Action names follow consistent patterns that indicate their function:
- Get_XXX: Actions for viewing information
- Example: Get_Origin_Modification allows users to view origin configuration settings
- Post_XXX: Actions for changing or editing settings
- Example: Post_Disable_Domain disables a domain
- Example: Post_Create_Domain creates a new domain
The XXX portion indicates the specific report, configuration item, or interface element being accessed.
System Policy Names
System policies follow a structured naming convention:
ProductName*FunctionType*FunctionName_FunctionRole
Components:
- ProductName: Specifies which product the policy applies to
- FunctionType: Indicates special categories
- VAS: Value-added service (not assigned by default to Main Accounts)
- custom: Custom feature (not assigned by default to Main Accounts)
- FunctionName: Describes the specific functionality
- FunctionRole: Indicates the permission scope
- report: Viewing reports
- config: Managing configurations
- data: Accessing data
Example: MA-Live_VAS_DedicatedCaching_Report grants permission to view dedicated caching reports for the Media Acceleration Live product.
Non-product policies apply to common services such as log downloads or content management.
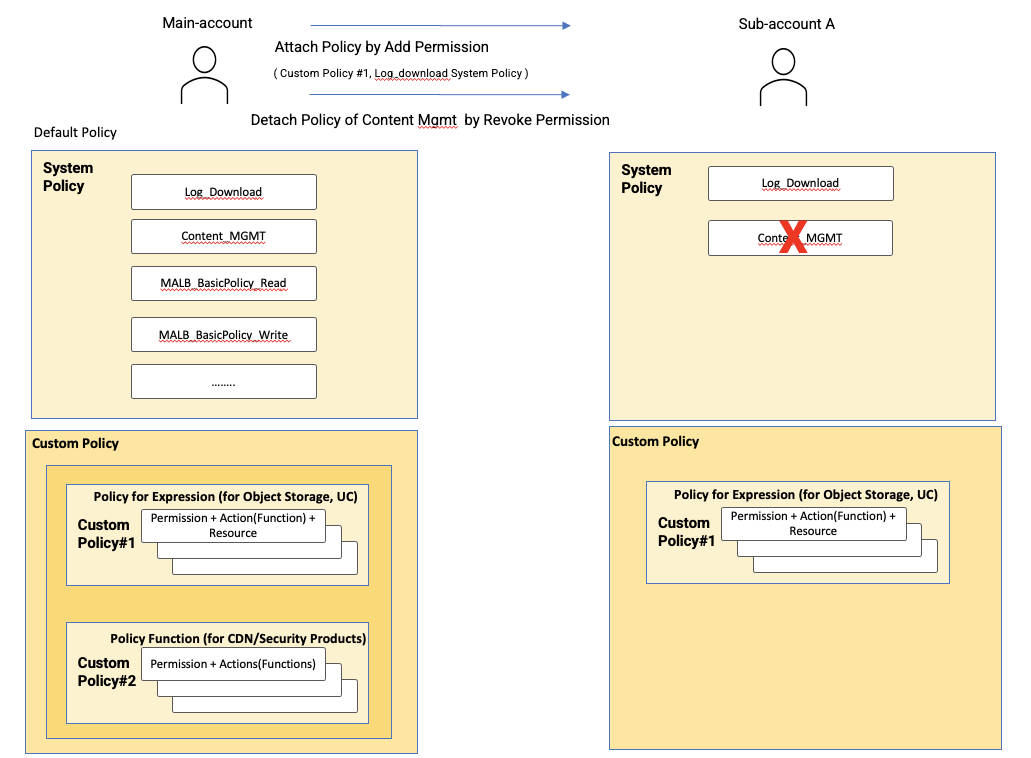
Default Policy Management
- Main Accounts automatically receive system policies for contracted Atomile products.
- Add permissions by attaching policies to grant access to product operations.
- Remove permissions by detaching policies to revoke access from Sub Accounts.
Working with Functional Policies
Viewing Policy Actions
To examine which actions are included in a policy:
- Click the policy name you want to view.
- Review the action list to see all included permissions.
Creating Multi-Product Policies
To combine actions from different products into a single policy:
- Select actions from your first product, such as Content Acceleration, and set the effect to allowed.
- Switch to another product, such as Media Acceleration VoD, and select additional actions.
- Click Save to create a consolidated policy that includes permissions across multiple products.